The Website Design and Development Process Explained
Designing and developing a website isn’t just about making something that looks good – it’s about creating a digital experience that performs well, reflects your brand, and meets user needs. To get there, you need a thoughtful, strategic process.
At WDG, we guide clients through a structured design and development approach that brings clarity, creativity, and collaboration to every step. Whether you’re redesigning an outdated site or starting fresh, understanding this process helps set expectations and ensures a smoother path to launch.
Key Takeaways
- A structured website process aligns teams, reduces risk, and improves results.
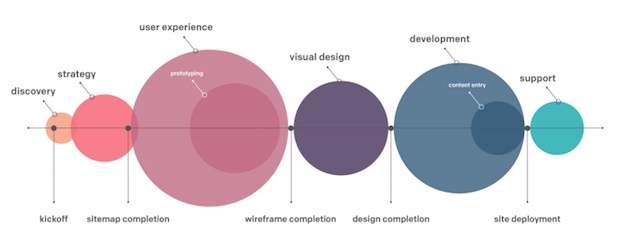
- The full process includes discovery, UX, design, development, testing, and post-launch support.
- Each step builds on the last to create a cohesive, functional digital experience.
- WDG leads clients through this journey with custom strategies and platforms like WordPress and Drupal.
Why Process Matters in Website Projects
Having a clear process isn’t just for the sake of organization; it’s what allows creative and technical teams to deliver work that meets business goals.
A solid process:
- Keeps stakeholders aligned from kickoff to launch
- Ensures user needs are prioritized in content and design
- Helps avoid costly rework or delays
- Makes room for collaboration, iteration, and QA
Without one, even the best creative ideas can get derailed. With one, your site has the foundation it needs to succeed long after launch.
Step 1: Discovery and Research
Every strong website starts with understanding. During discovery, teams gather insights about your organization, audience, and digital goals.
This phase typically includes:
- Stakeholder interviews and workshops
- Audience research and persona development
- Site audits and content reviews
- Analytics and performance baselining
- Competitive and industry analysis
The output is often a strategy brief or findings document that defines goals, users, success metrics, and technical requirements.
Step 2: Information Architecture and UX Strategy
Before design begins, the user experience must be mapped out. Information architecture (IA) and UX strategy ensure your content is easy to find and navigate.
This stage includes:
- Sitemap planning to define top-level navigation and page hierarchy
- Wireframes for key templates and layouts
- User flows to visualize how visitors complete key tasks (like donating or signing up)
- Accessibility planning to ensure inclusive design from the start
When done right, this phase creates a blueprint for a logical, intuitive website.
Step 3: Visual Design
Now it’s time to bring the brand to life. Designers translate wireframes into high-fidelity mockups using approved fonts, colors, imagery, and UI elements.
During design, teams:
- Create custom layouts for key templates and components
- Apply responsive design techniques for all screen sizes
- Build or extend a visual design system or pattern library
- Collaborate with content and accessibility experts to maintain clarity and contrast
Design is where user experience and brand storytelling come together. Final files from this phase inform front-end development.
Related: Website Redesign Process
Step 4: Development and CMS Integration
Once designs are approved, developers build the front and back end of the website.
This involves:
- Coding templates using HTML, CSS, and JavaScript (or modern frameworks)
- Integrating a CMS such as WordPress or Drupal for content editing
- Developing custom functionality like forms, search, or user roles
- Creating staging environments for collaboration and testing
The result is a fully functional website that mirrors the design and supports your content strategy.
Step 5: Content Loading and QA Testing
With the site built, it’s time to load content and test everything before launch.
Activities include:
- Migrating or inputting page content, images, and metadata
- Testing across devices, browsers, and screen sizes
- Reviewing accessibility compliance (WCAG)
- Validating site speed, SEO tags, and structured data
- Troubleshooting bugs or layout inconsistencies
This is a collaborative phase involving content owners, developers, designers, and QA specialists.
Step 6: Launch and Post-Launch Support
Once testing is complete and content is approved, the site goes live.
The launch phase includes:
- Final pre-launch QA and stakeholder signoff
- Deploying to the production environment
- Monitoring performance and uptime
- Setting up analytics and user tracking
- Providing training and documentation to your team
A good partner doesn’t disappear after launch. At WDG, we offer support plans, optimization sprints, and roadmap consulting to help you evolve your site over time.
How WDG Guides Clients Through This Process
Every website we build is guided by process – but not just any process. At WDG, we customize each project based on your needs, team structure, and goals. Whether you’re launching a campaign site or overhauling a complex CMS platform, we help:
- Align teams across content, UX, design, and development
- Define scalable architecture and user-focused interfaces
- Build with performance, accessibility, and long-term growth in mind
We specialize in WordPress and Drupal development, but our work starts long before a single line of code. It starts with strategy, and continues well beyond launch. Contact us today to get started!
FAQs About Website Design and Development
Can I skip some of the process if I’m on a tight budget?
You can scale some parts, but skipping steps like discovery or QA risks bigger issues later. A phased or MVP approach is often better.
Do I need to have all my content ready before design starts?
Not always. Placeholder content can work early on, but final content should be ready before development or QA.
What CMS platforms does WDG use?
We specialize in WordPress and Drupal, choosing the best fit based on your content, governance, and technical needs.
Related Insights